HanCaster User Guide
Send the HDMI screen of a PC, camera or device with very low delay, and watch it right away in a browser or on a TV. You can even operate that PC remotely with your own mouse and keyboard.
1. What is HanCaster
HanCaster takes the screen coming in over HDMI and sends it over the network so it can be watched in many places at once. Use it to show a meeting-room presentation on another floor, to monitor equipment screens remotely, or to operate a server-room PC from your desk.
- Very low delay. On the same network, movement on screen appears almost instantly (about 0.1 s).
- Up to 4K at 60 frames per second, with sound.
- Remote control (KVM) — viewers can operate the PC connected to the encoder with their own mouse and keyboard.
- Voice chat — people watching the same screen can talk to each other with a microphone.
- Through an external server, it can be watched across the internet.
2. Before you start
| Encoder | HDMI output of the source (PC, camera, etc.) → HDMI input of the encoder. Connect a LAN cable and power. For remote control, also connect a USB port of that PC to the USB-C port on the front of the encoder (section 5). |
|---|---|
| Viewers | An up-to-date Chrome or Edge is recommended. If the video codec is H.265, some browsers cannot play it — switch the encoder to H.264 in that case. |
| Receiver | Connect it to a TV or monitor over HDMI, then connect a LAN cable and power. |
| Addresses | The settings pages of the encoder and receiver open at each device's IP address (e.g. http://192.168.0.20/). Ask the person who installed them for the addresses. |
3. Encoder settings
Open the encoder's address in a browser to get its settings page. The top part, Encoder Settings, decides what to send; the lower part, Device Settings, shows the input and network. The dot and word at the top right show the current state — grey Idle, green Live.
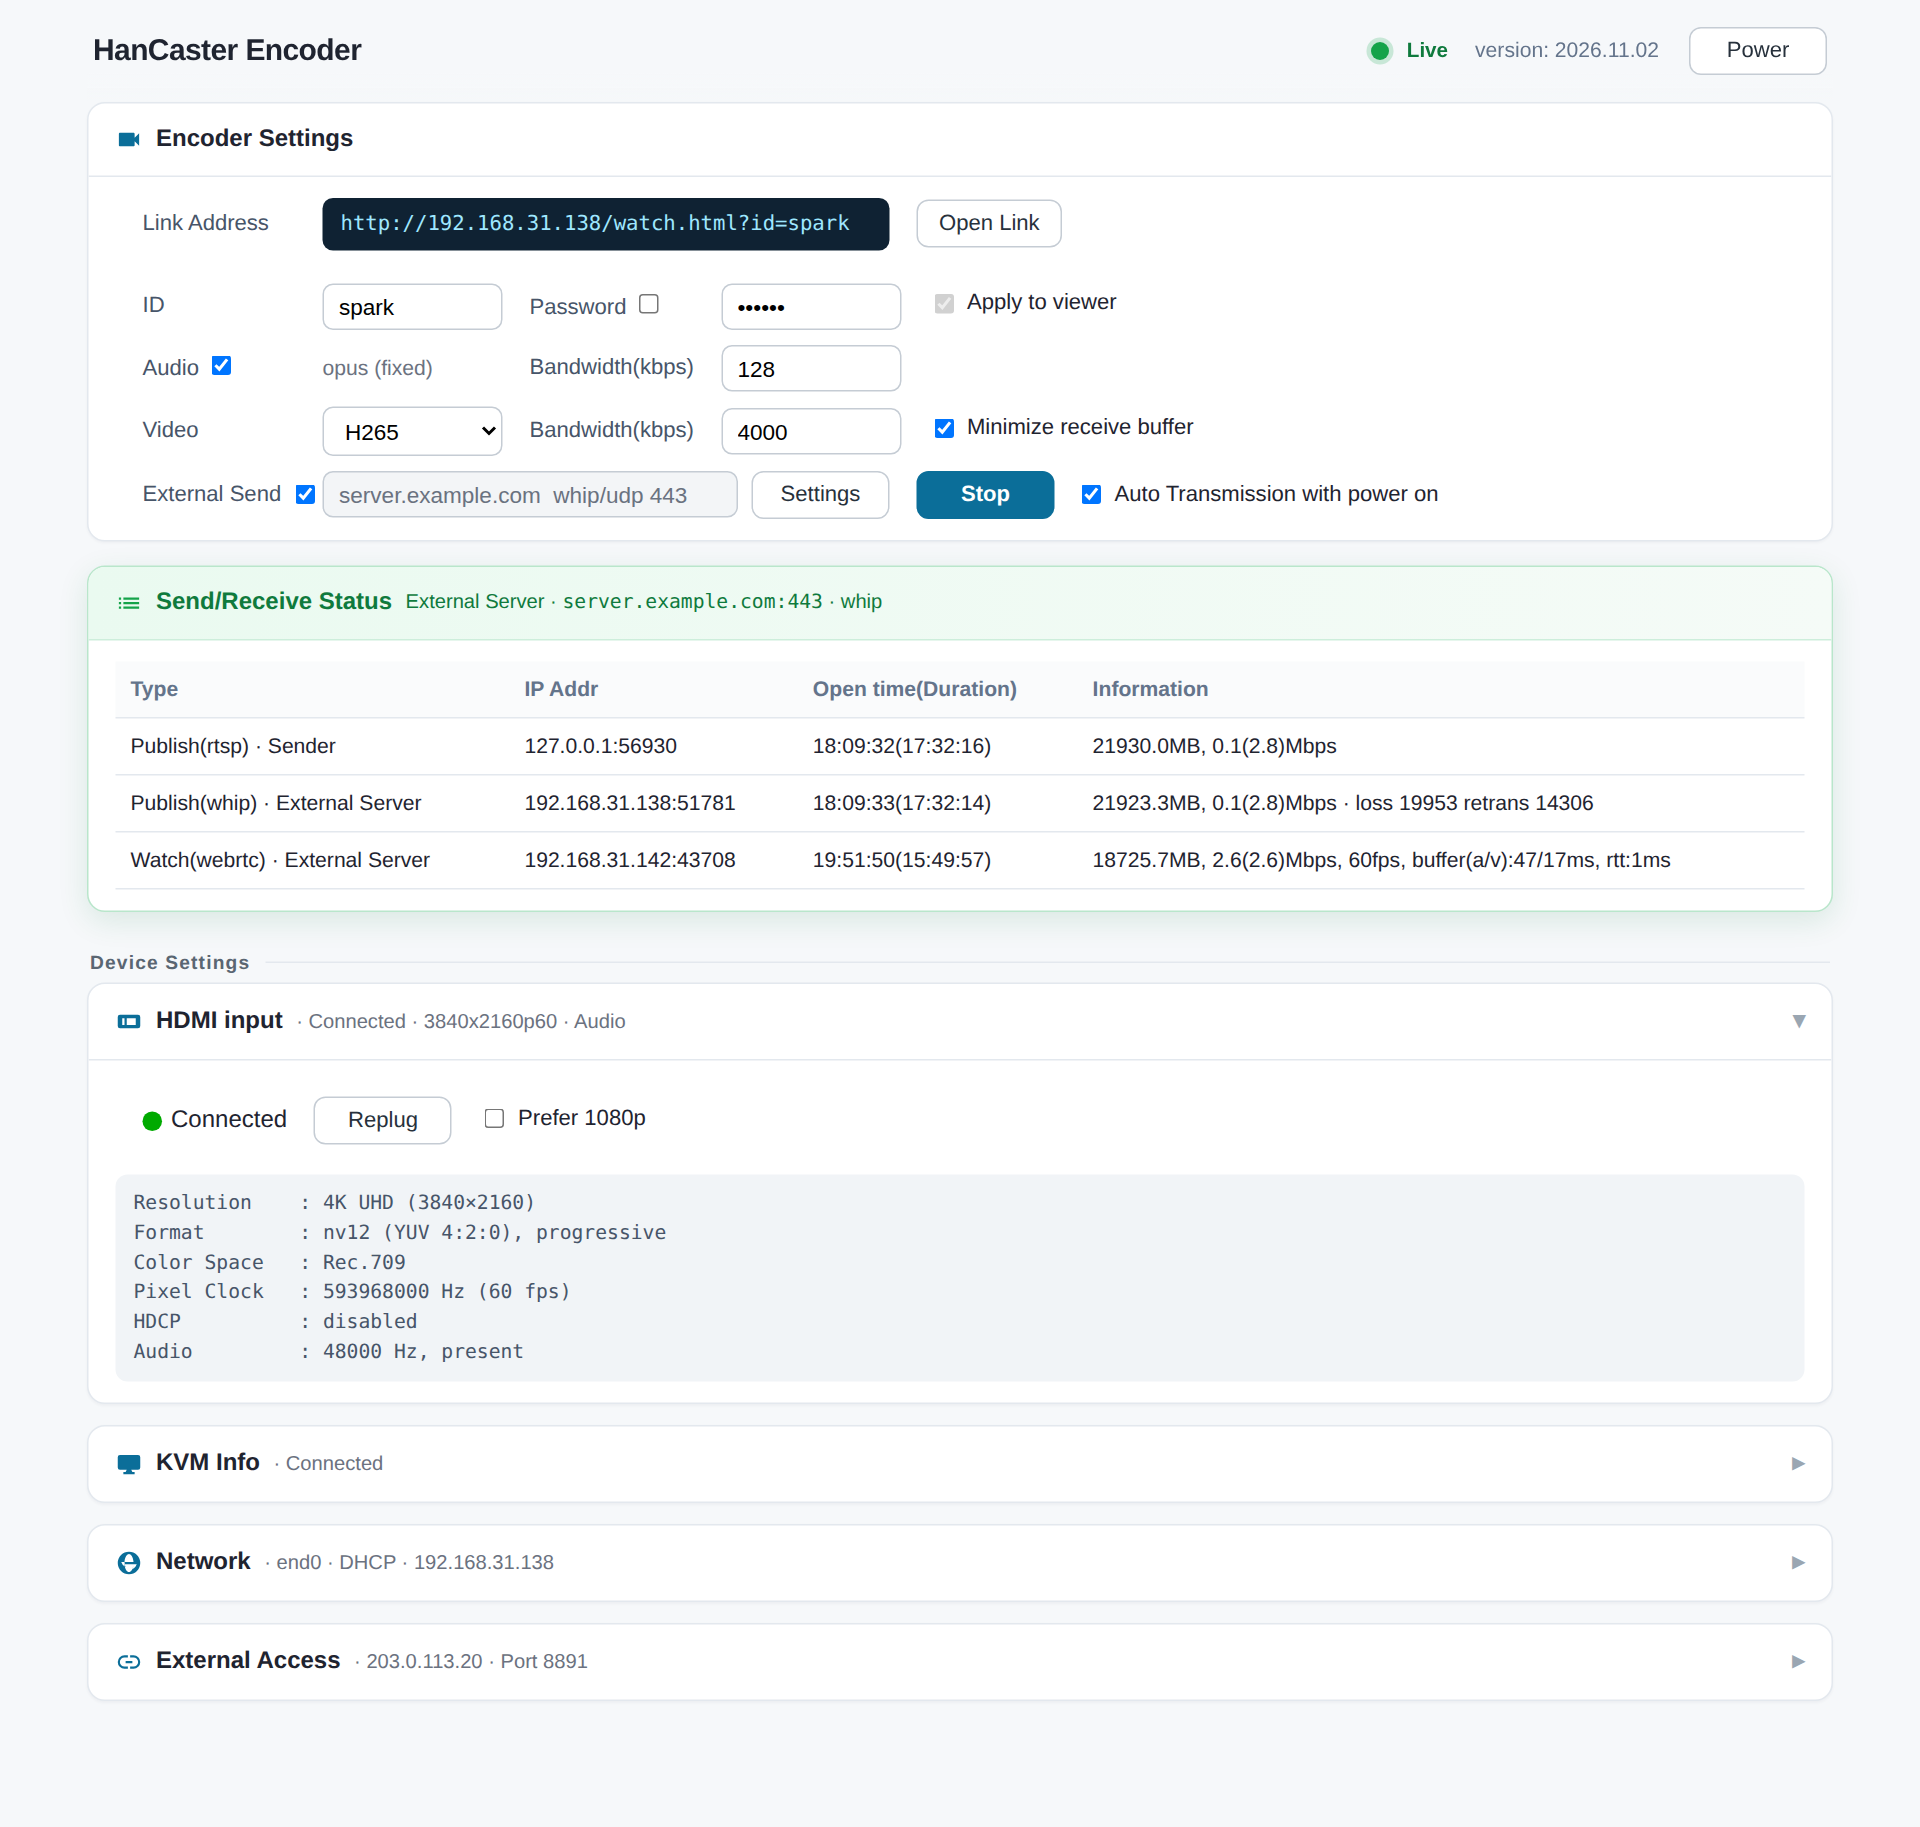
3-1. Encoder Settings
| Link Address | The viewer page address to give to viewers. [Open Link] opens it right away. |
|---|---|
| ID | The name of this stream. It becomes the id= value at the end of the viewer address. Use letters and numbers. |
| Password | When checked, the settings page asks for an ID and password. Enter the password in the box on the right. |
| Apply to viewer | With Password on, decides whether the viewer page also asks for the same password. |
| Audio | When checked, the HDMI sound is sent too. 128 kbps is enough. |
| Video | H.264 plays in almost every browser. H.265 sends the same quality with less data, but some browsers cannot play it. Higher bandwidth (kbps) means a sharper picture — 4000 to 8000 is typical. |
| Minimize receive buffer | Shortens the time the viewer's browser holds video and sound before playing, for even lower delay. Use it on stable networks such as within one office. Turn it off if you see stuttering over the internet. |
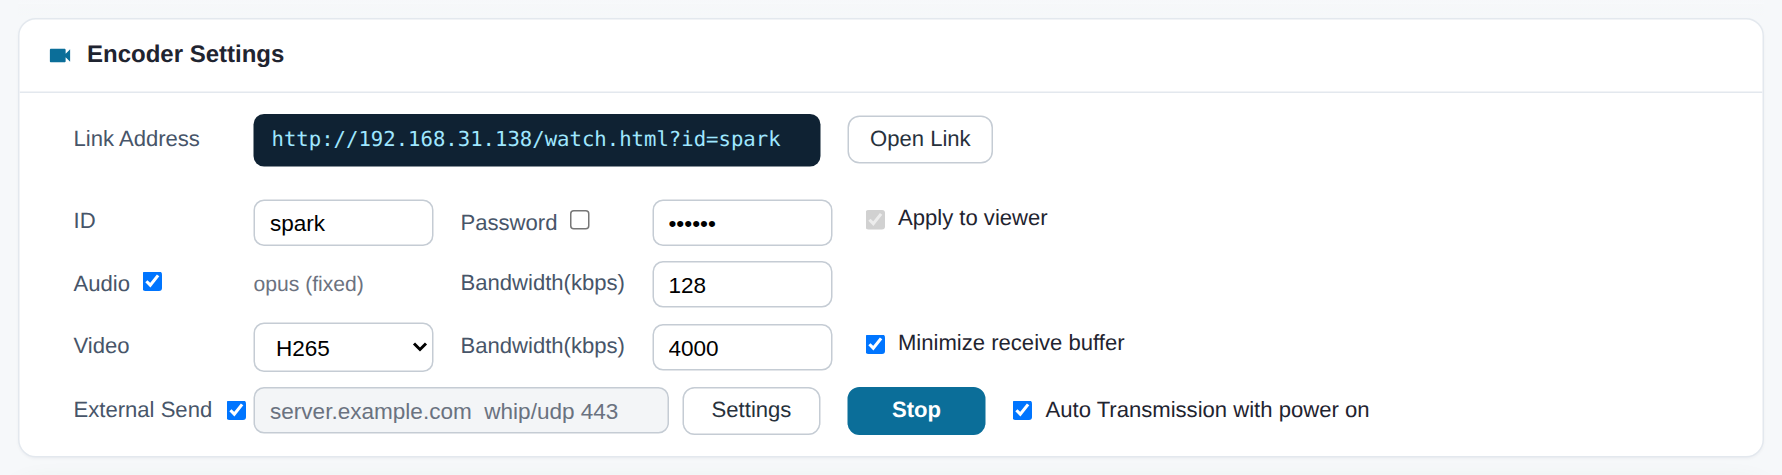
| External Send | When checked, the stream is also sent to an external server (section 7). Choose the method in [Settings]. |
| [Publish] / [Stop] | Starts or stops sending. Changed values such as codec and bandwidth take effect from the next [Publish]. |
| Auto Transmission with power on | Starts sending automatically when the power comes on. Check it where the encoder runs all the time. |
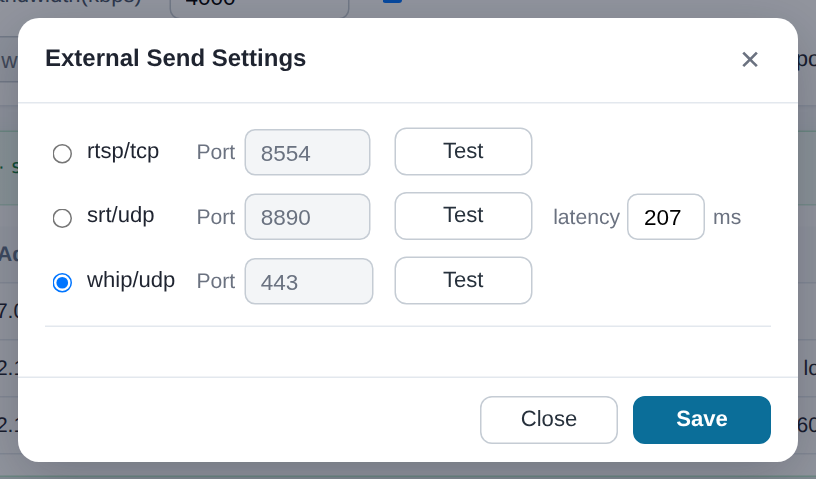
3-2. Send/Receive Status
While sending, a table shows who is watching: type (send or receive), peer address, connected time, and data volume and rate.
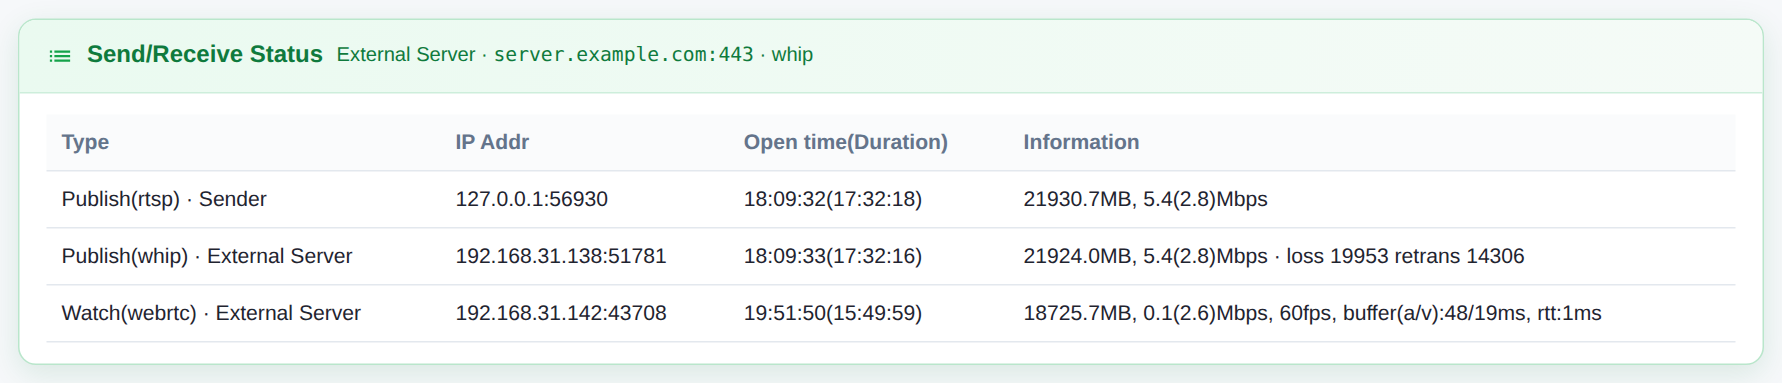
3-3. Device Settings
Click a title to open or close it. A summary stays visible next to the title when closed.
- HDMI input
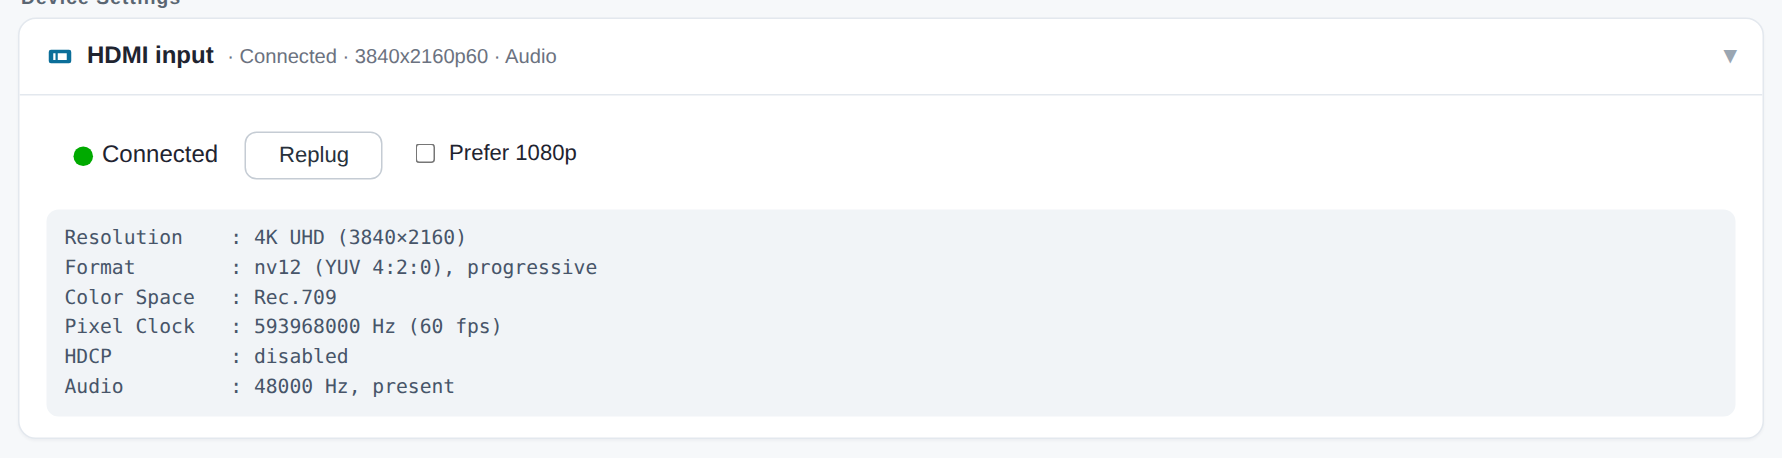
- Shows the resolution, format and audio of the incoming signal. It must be green (connected) before you can send. [Replug] re-establishes the HDMI connection. Prefer 1080p avoids receiving 4K needlessly, for example when a laptop mirrors its screen.
- KVM Info
- Connection state of the remote-control USB and whether it is in use. See section 5.

- Network
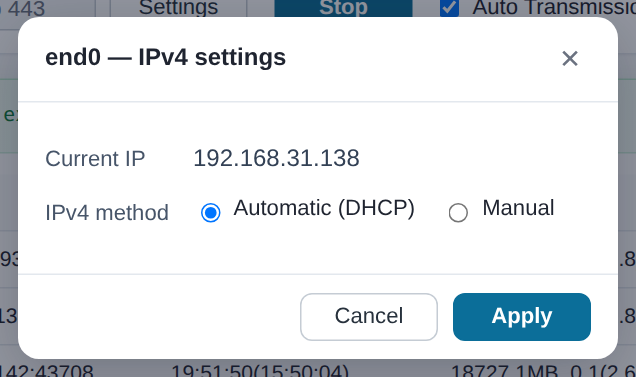
- Shows the LAN port and address. Click the gear on the right to switch between automatic (DHCP) and manual addressing. A wrong change can lock you out of the settings page, so note the current values first.

- External Access
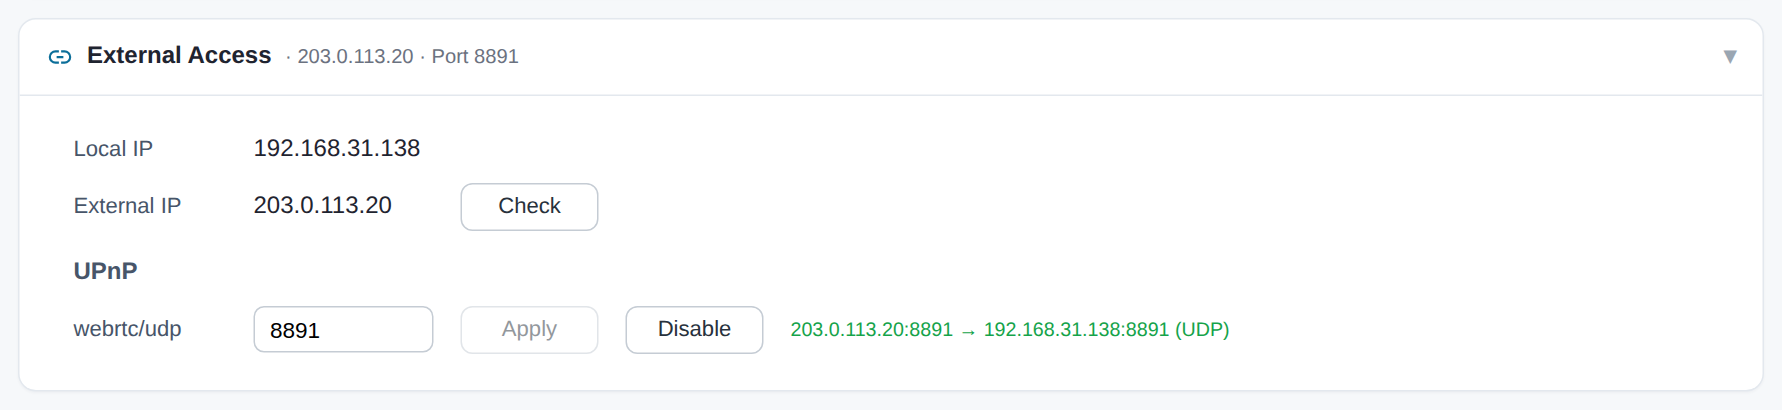
- The port used when people on the internet connect to the encoder directly. If your router supports UPnP, [Enable] registers it automatically and the result appears in green. If several encoders sit behind the same router, give each a different port.
3-4. Power
Use [Power] at the top right to Reboot or Shut down the encoder.

4. Watching in a browser
- Open the encoder's Link Address in a browser ([Open Link] on the settings page, or the address you received).
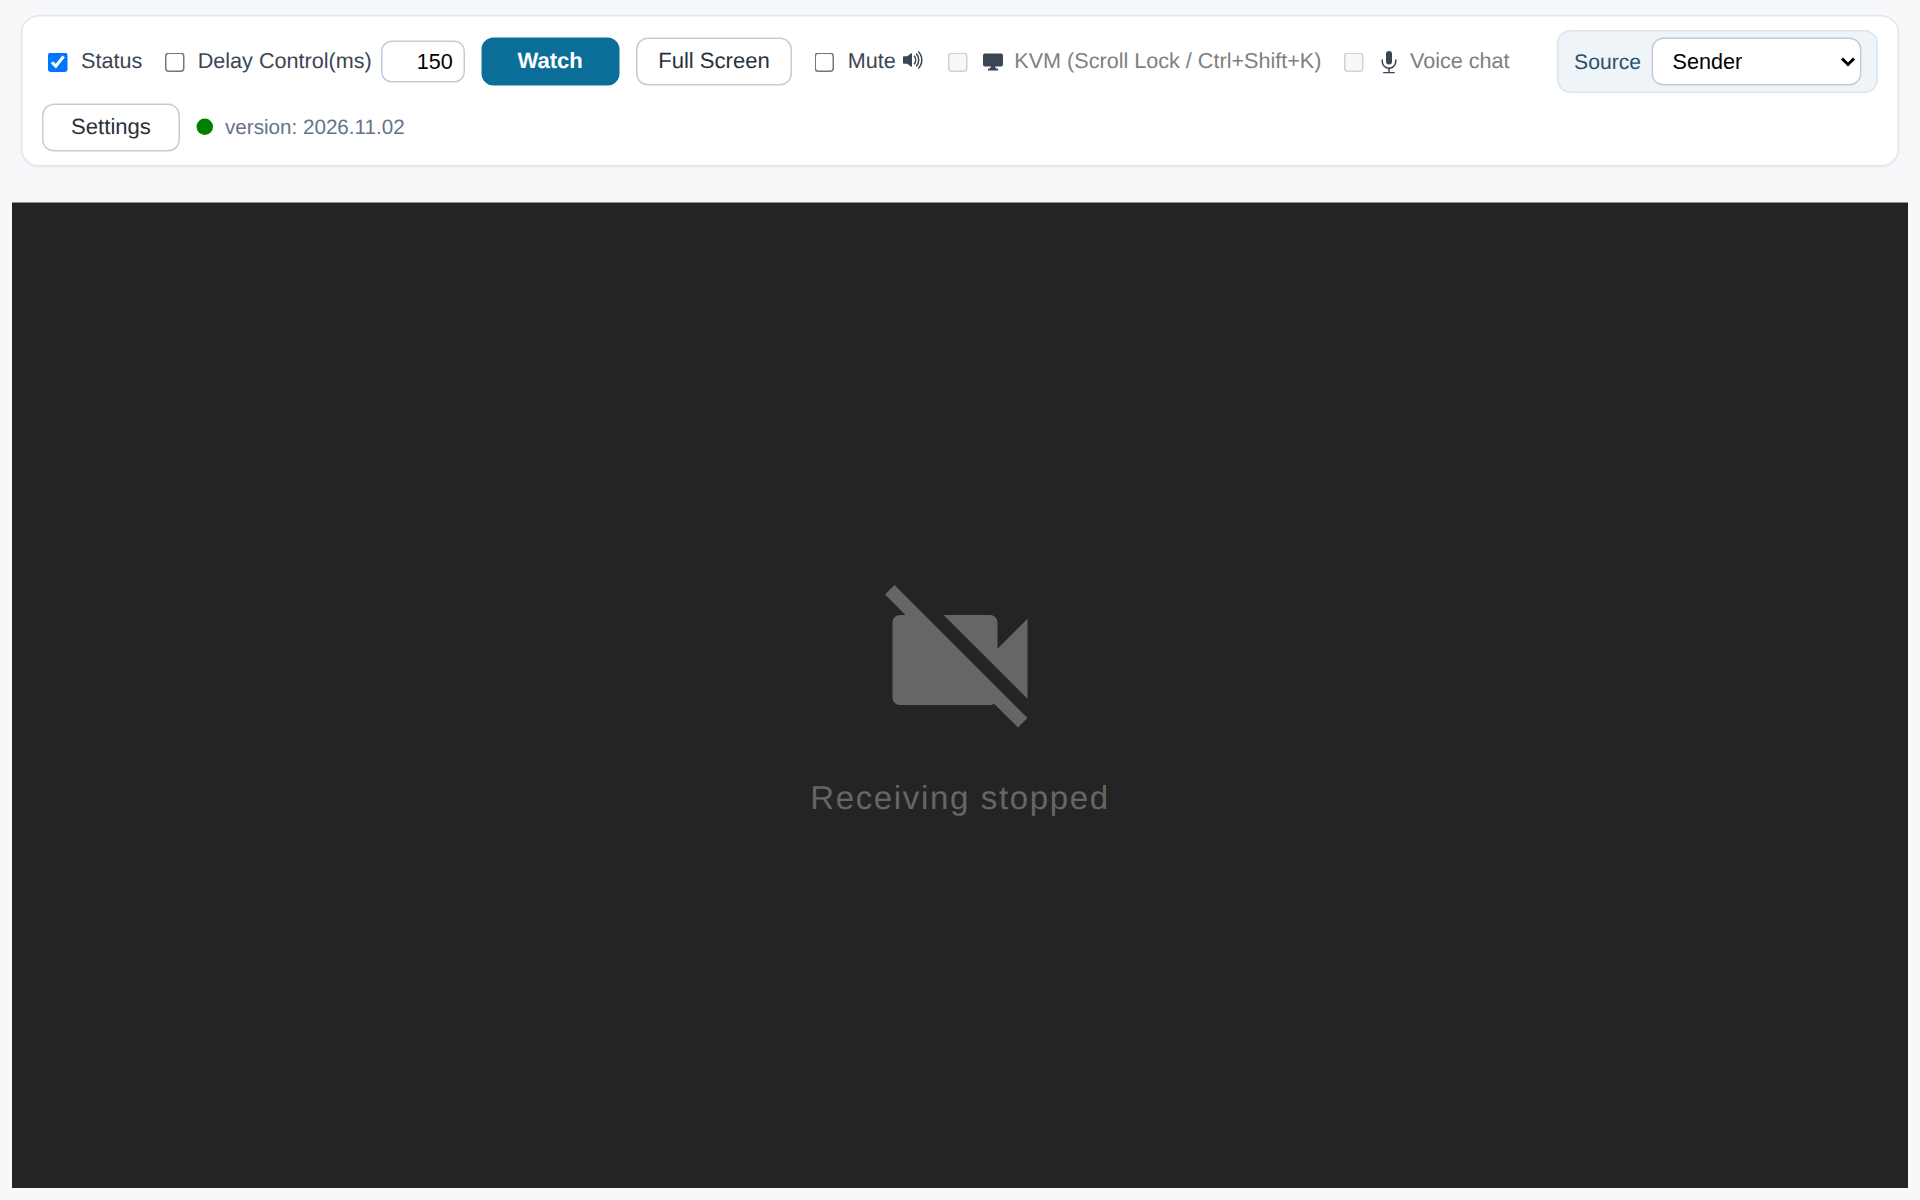
- Press [Watch]. The video starts and the button changes to [Stop].
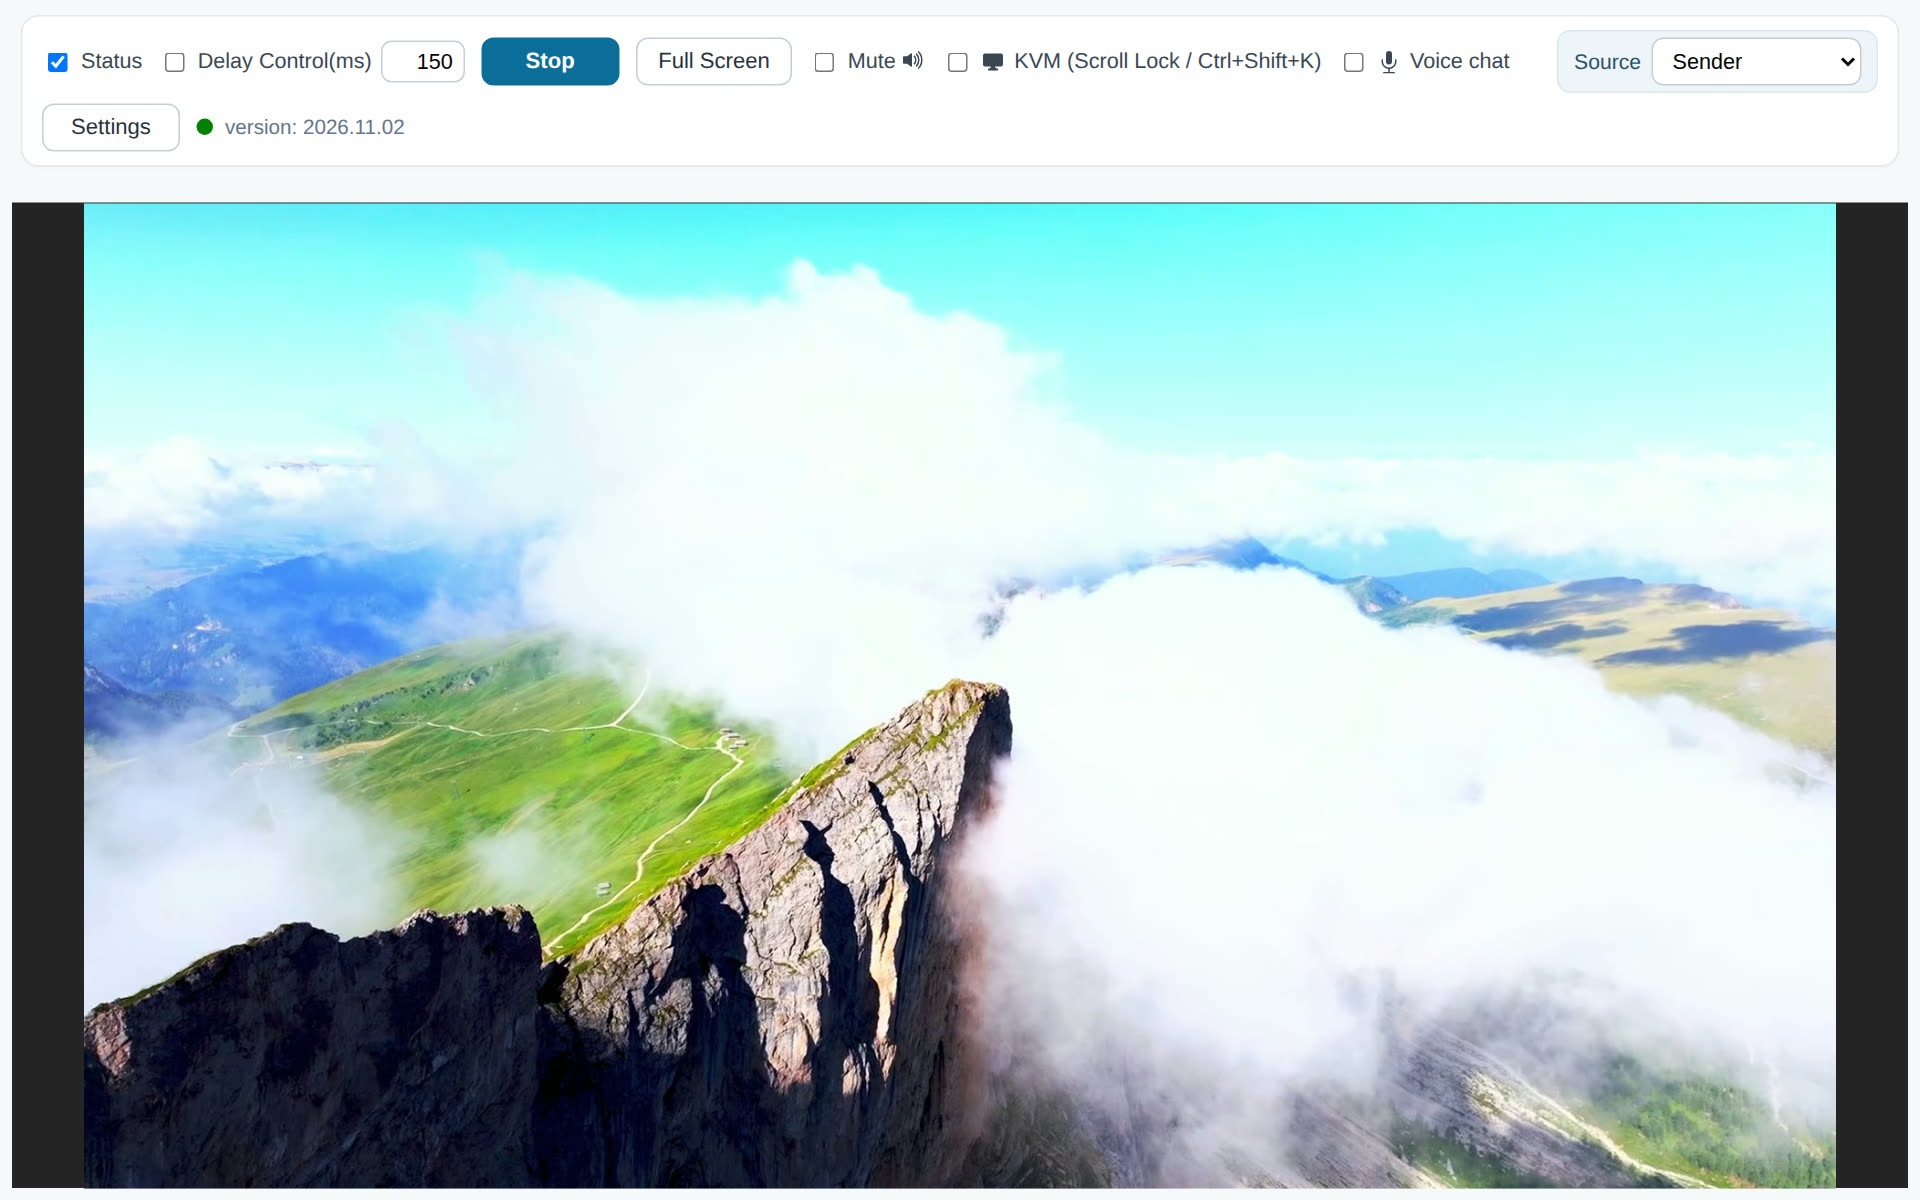
Top menu

| Status | Shows codec, resolution, rate, frames and delay over the video in yellow text. |
|---|---|
| Delay Control(ms) | When checked, the video is buffered by the given number of milliseconds before playing. Increase it if playback stutters (delay grows accordingly). |
| [Watch] / [Stop] | Starts or stops watching. |
| [Full Screen] | Fills the screen with the video. Press Esc to return. |
| Mute | Turns sound off and on. |
| KVM | Turns on remote control (section 5). Scroll Lock or Ctrl+Shift+K also toggles it. |
| Voice chat | Talk with other people watching the same screen using your microphone. They need to turn on Voice chat too. It is not a call to the encoder side. |
| Source | If the encoder is also sending to an external server, choose whether to receive directly from the encoder (Sender) or via the server (External Server). |
| [Settings] | Goes to the encoder settings page. |

5. Remote control (KVM)
A viewer operates the PC connected to the encoder over HDMI with their own mouse and keyboard. Useful for handling PCs in a server room or on site from your desk.
- Connect a USB port of that PC to the USB-C port on the front of the encoder with a USB cable. The PC recognises the encoder as a keyboard and mouse.
- When KVM Info on the encoder settings page turns green (Connected), check KVM Active.
- On the viewer page, check KVM. Mouse and keyboard actions over the video now go to that PC.

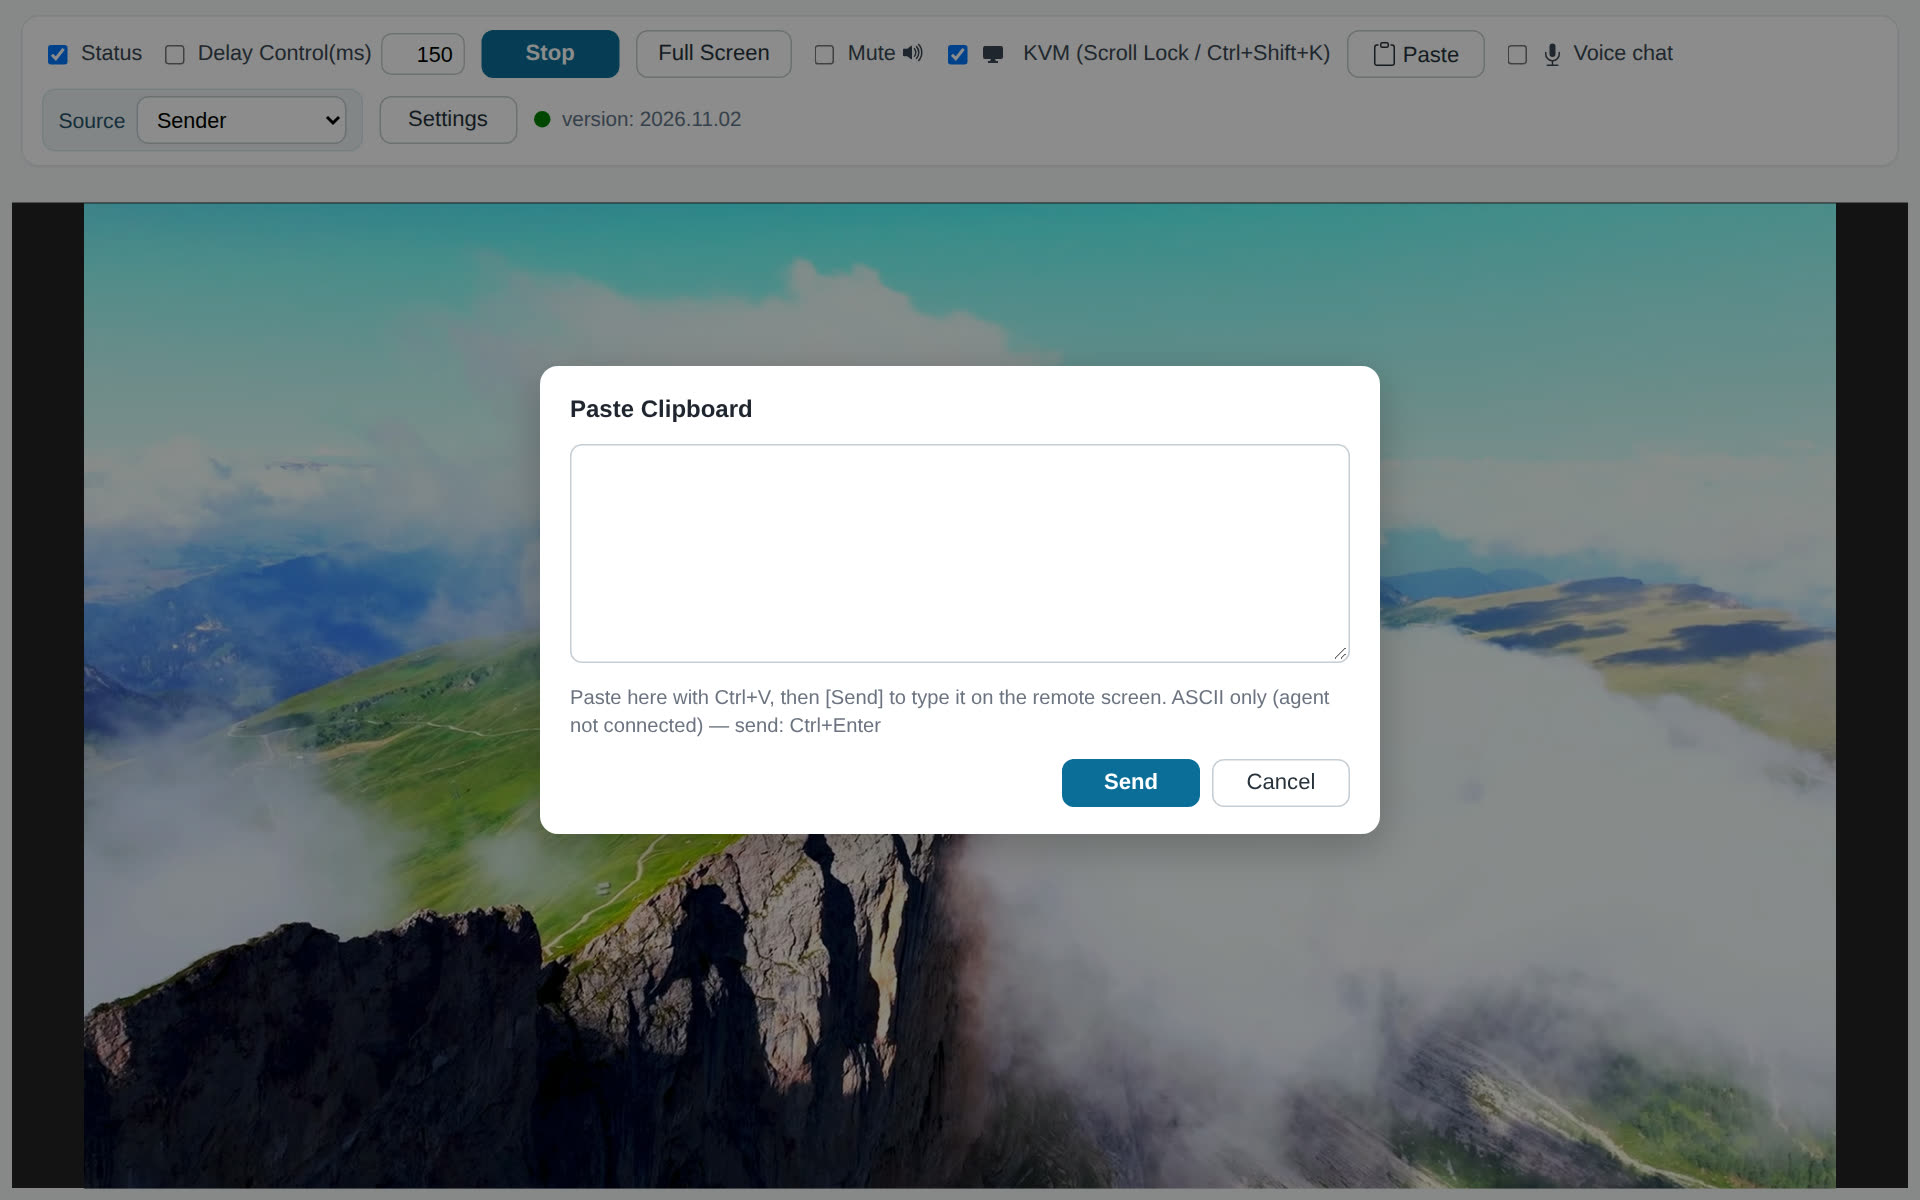
Paste — types text copied on your PC into the remote PC. Paste it into the box and press [Send] (Ctrl+Enter); it is typed as keystrokes.
- Only one person controls at a time. The current controller appears under Active User in the encoder's KVM Info, and [Revoke] takes control back.
- If the remote PC extends its desktop over several monitors, the mouse stays within the main monitor. Use mirroring instead.
- Alt+Tab and Win key combinations are taken by your own PC and do not reach the remote PC. Switch windows by clicking the taskbar.
- Turn KVM on only when needed, and turn it off when done.
6. Receiver (connected to a TV)
Once connected to a TV or monitor, the receiver shows the chosen encoder's screen automatically every time it is powered on. Made for meeting rooms and control rooms.

Configure it by opening the receiver's address in a browser on another PC.
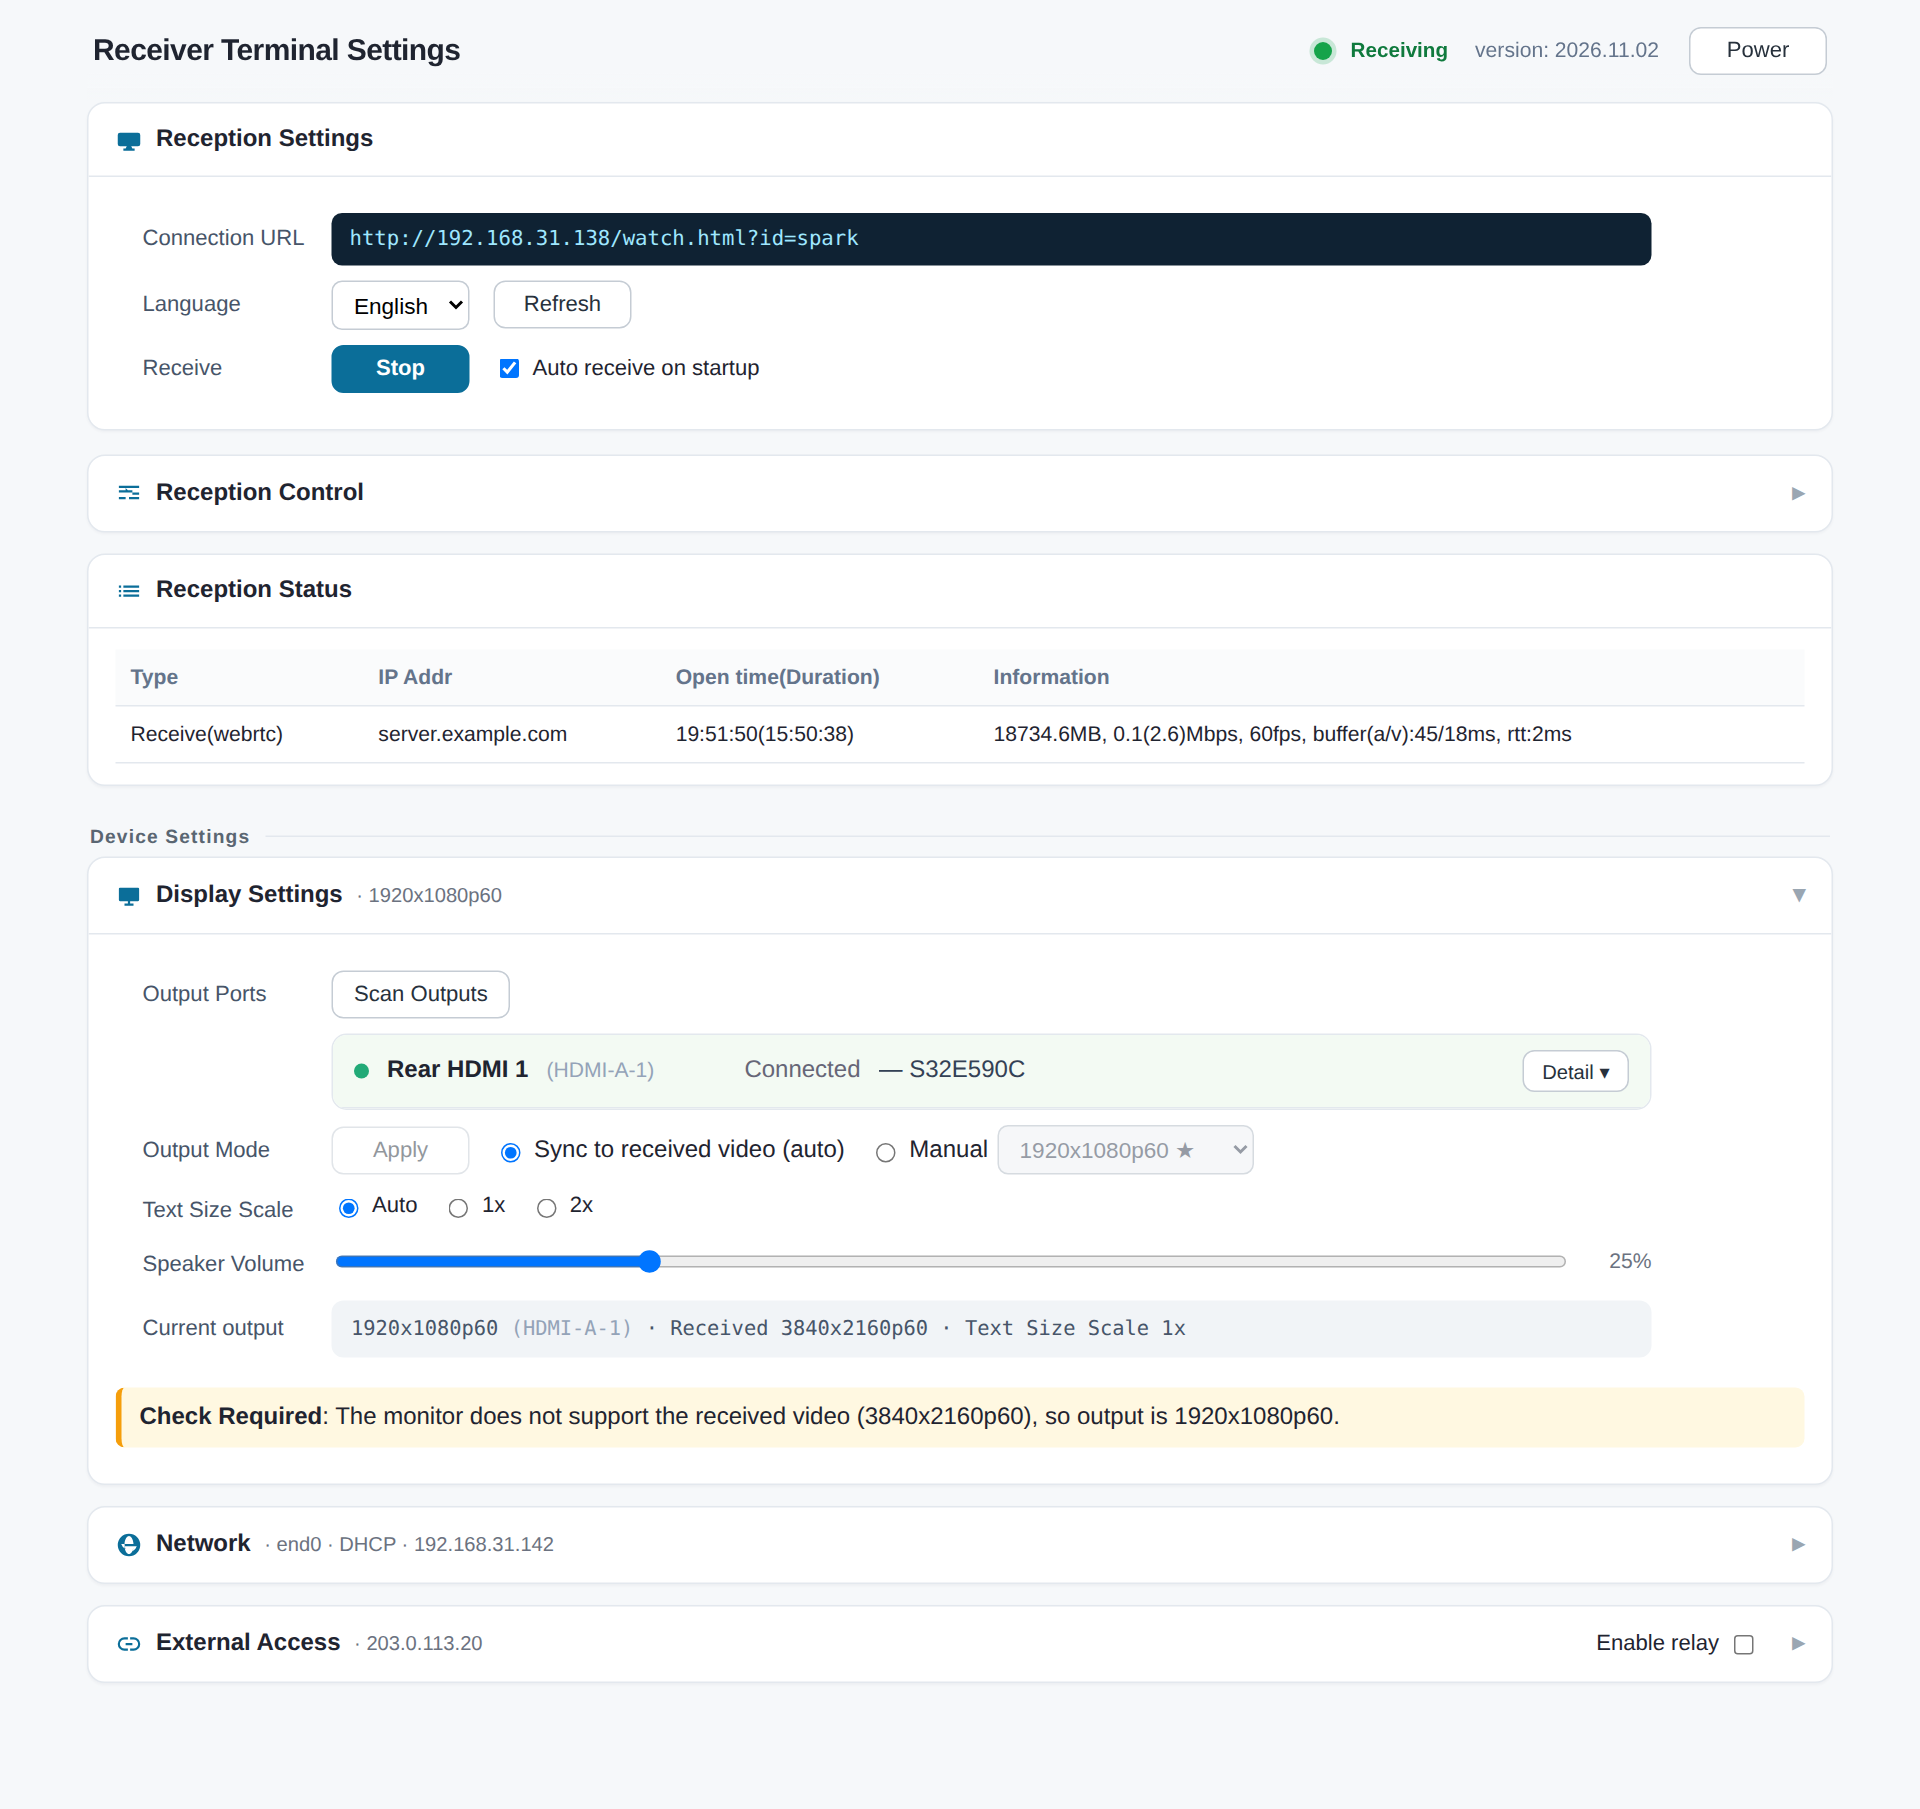
6-1. Reception Settings
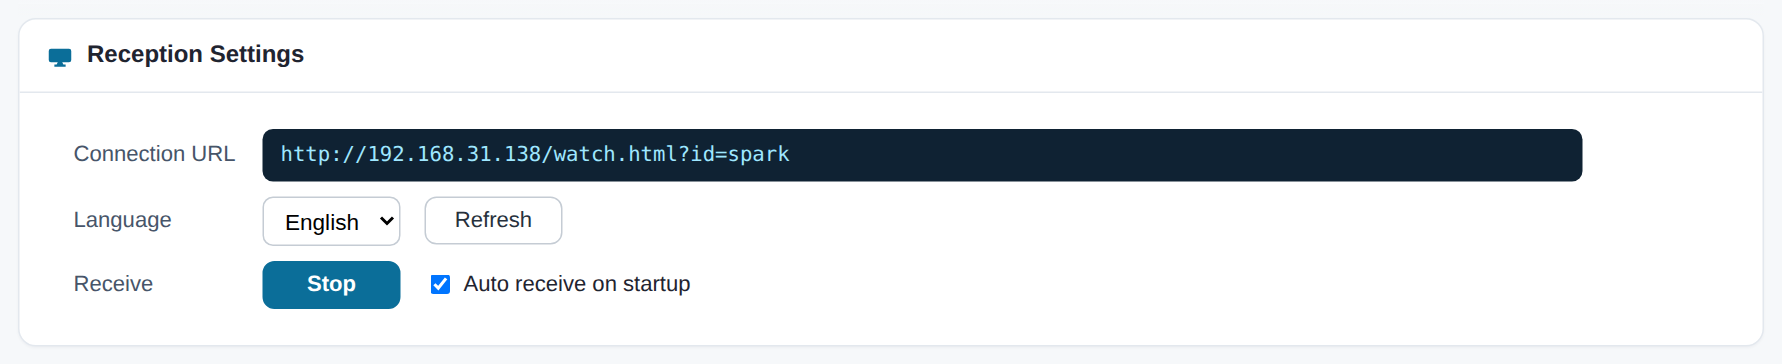
| Connection URL | Enter the Link Address of the encoder to show (it is on the encoder settings page). |
|---|---|
| Language | Language of the text shown on the TV. Press [Refresh] after changing it. |
| [Receive] / [Stop] | Starts or stops showing the video on the TV. |
| Auto receive on startup | Starts showing automatically when the power comes on. |
6-2. Reception Control · Reception Status
Reception Control changes Status, Delay Control, Mute and Source of the TV screen from here (same meaning as the menu in section 4). Reception Status shows the rate, frames and so on of the video being received.


6-3. Display Settings
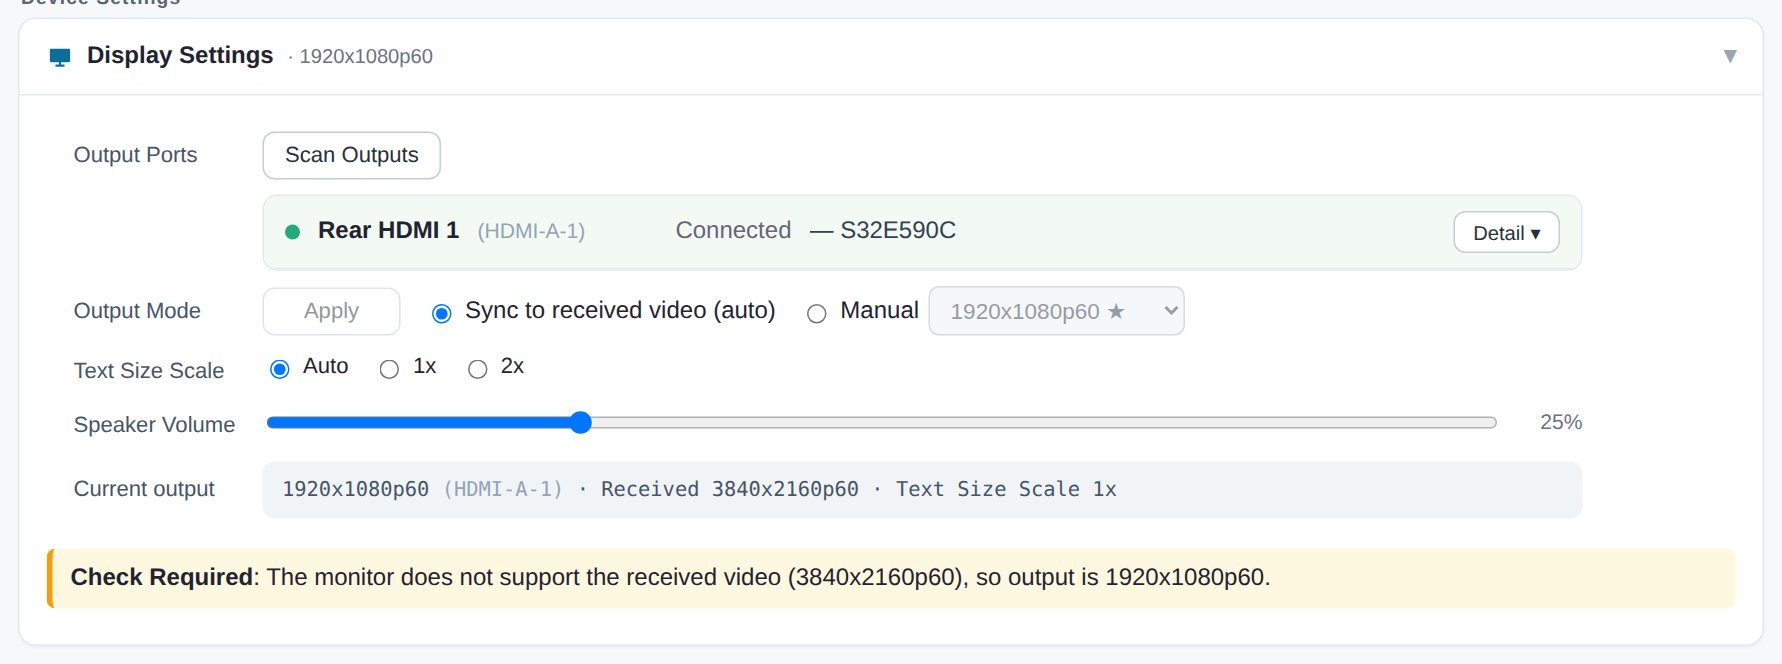
| Output Ports | Shows the HDMI port the TV is connected to and the TV's name. Press [Scan Outputs] after changing connections. [Detail] shows the resolutions the TV supports. |
|---|---|
| Output Mode | Sync to received video (auto) outputs at the same resolution as the received video. If the TV cannot take it, it outputs at a resolution the TV supports and shows a yellow notice. Manual lets you pick a resolution and [Apply] it. |
| Text Size Scale | Size of the text shown on the TV. |
| Speaker Volume | Volume of the sound sent to the TV. |
| Current output | The resolution being output and the resolution of the received video. |
6-4. Network · Power
Network and Power work the same as on the encoder (3-3, 3-4). External Access is explained next, in 6-5.
6-5. When the encoder side cannot be opened — Enable relay
The receiver connects to the encoder directly to fetch the video. So when the encoder is somewhere else (across the internet), the encoder's router must accept incoming connections (section 7). In places like these, the encoder side cannot be opened:
- The encoder is out in the field on a mobile router (LTE/5G) — most do not accept incoming connections.
- The router does not support UPnP, or you have no access to its settings (hotels, event venues, customer networks, etc.)
- A firewall blocks incoming connections.
In that case, open the door on the receiver side. The receiver opens a door (port) on its own router and tells the encoder that address; the encoder then sends the video through that door. From the encoder's point of view this is an outgoing connection, so mobile routers and firewalls let it through.
- Open External Access in the receiver settings and press [Check] to see the external IP.
- Press [Enable] for the webrtc/udp port (8889 by default). When the router opens it via UPnP, "external IP:port → receiver IP:port" appears in green. If not, forward that UDP port to the receiver manually on the router. If the receiver has a public IP directly, this step is not needed.
- Check Enable relay at the right of the title.
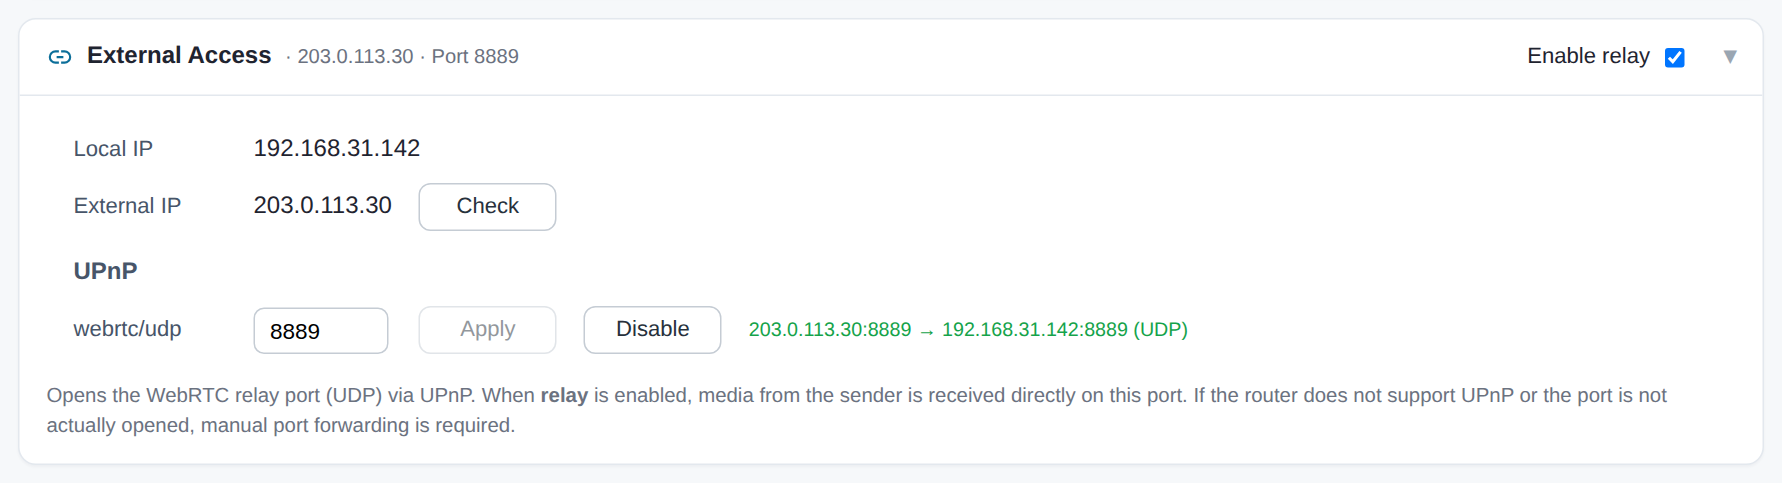
A direct connection is always tried first; the relay is used automatically only when it fails. So it does no harm to leave it on. While receiving through the relay, "receiving via relay :8889" appears next to the Reception Status title.

7. Watching over the internet
To watch from outside the office, use one of the three ways below. The key point: if either the encoder side or the receiver side can open a door (port), you can watch directly without a server.
| Via an external server | Turn on External Send on the encoder to send to a server. Viewers open the server's viewing address. No router setup is needed on either side, and it suits many browser viewers. Get the server address and send method from the server administrator. |
|---|---|
| Open the encoder side | Open the port in the encoder's External Access on the router (UPnP or manual port forwarding). Browsers and receivers then open the encoder's Link Address directly from the internet. Always keep Password on in this case. |
| Open the receiver side (Enable relay) | When the encoder side cannot be opened (mobile router, no UPnP, no access to settings, firewall), open the receiver side instead (6-5). Works only when watching on a receiver. |
8. Troubleshooting
- Pressing [Publish] does not send
- Check that HDMI input is green (connected). If not, reconnect the cable, press [Replug], and make sure the source's display output is on.
- The source is on but HDMI input does not connect (4K)
- Turn Prefer 1080p on once and then off again. The source re-establishes the connection, and 4K is often detected after that.
- No video on the viewer page
- Check that the encoder is Live and that
id=in the address matches the encoder's ID, then press [Watch] again. If the screen stays black, the browser may be unable to play H.265 — switch the encoder to H.264. - The video stutters or lags
- Turn on Status and check rate and frames. Lower the encoder's video bandwidth, or turn on Delay Control on the viewer page and raise the value. If Minimize receive buffer is on, try turning it off. Wired connections are more stable than Wi-Fi.
- No sound
- Check Mute on the viewer page, the Audio checkbox on the encoder, and
Audio: presentunder HDMI input. On a receiver, also check Speaker Volume. - Nothing on the receiver's TV
- Check that the output port shows connected and press [Scan Outputs]. Make sure the Connection URL is correct and press [Refresh]. Sync to received video (auto) is the recommended output mode.
- Remote control (KVM) does not work
- Check in order: the USB-C cable, KVM Active on the encoder, and KVM on the viewer page. If someone else is in control, press [Revoke] on the encoder and try again.
- Cannot watch over the internet
- With an external server, press [Test] in External Send [Settings]. When connecting directly to the encoder, check the UPnP result (green text) in External Access or the router's port forwarding.
- The encoder is on a mobile router outside, and nothing shows on the office receiver
- Mobile routers often block incoming connections. Turn on Enable relay on the receiver and open the port on the receiver side (6-5).
9. Frequently asked questions
- How long is the delay?
- About 0.1 s on the same network. Going over the internet or through an external server adds delay depending on the line, and turning on Delay Control on the viewer page adds its value.
- How many people can watch at once?
- Many people can watch at the same time. When watching directly from the encoder, the video is sent separately to each viewer, so the encoder's line must comfortably exceed "video bandwidth × number of viewers" (e.g. 10 viewers of a 4 Mbps stream need about 40 Mbps). For many viewers or viewers on the internet, use an external server — the encoder then sends only once, to the server.
- Can it record?
- The encoder has no recording function. With an external server, recording may be available on the server — ask the server administrator.
- Can I change the screen language?
- The settings pages and the viewer page follow the browser language (Korean, English, Japanese, Chinese). The receiver's TV screen uses Language in the receiver settings.
- Streaming services or Blu-ray show a black screen
- Copy-protected (HDCP) content cannot be sent. The source either does not output it over HDMI or replaces it with a black screen.
- Sound from the PC stutters or is missing
- Set the sending PC's audio output to stereo (2 channels). Outputting 5.1 or 7.1 channels can make the sound stutter.
- Can I watch on a smartphone or tablet?
- Yes. Open the Link Address in the browser. H.265 video may not play on some devices. Use remote control (KVM) on a PC with a mouse and keyboard.
10. Appendix — specifications and terms
Specifications
| Video input | One HDMI input. Up to 3840×2160 at 60 fps (including 59.94 fps), plus common PC and camera outputs such as 1920×1080. Both RGB and YUV input are accepted. Please contact us about other formats (interlaced, etc.). |
|---|---|
| Video compression | H.264, H.265 (hardware encoding). Bandwidth is set on the settings page. |
| Audio | HDMI audio (stereo) → Opus 128 kbps |
| Sending | Same network: directly to browsers (WebRTC). To an external server: RTSP, SRT or WHIP. |
| Viewing | Recent browsers with WebRTC (Chrome or Edge recommended). H.265 playback depends on the browser and device. |
| Remote control | Acts as a keyboard and mouse over USB-C. Clipboard text input (Paste). |
| Receiver output | HDMI. Automatically matches the received video resolution (up to 3840×2160 at 60 fps); lowered to a supported resolution if the TV cannot take it. |
| Screen languages | Korean, English, Japanese, Chinese |
Terms
| Link Address | The address of the viewer page. Open it to watch. |
|---|---|
| ID | The name of the stream; the id= value at the end of the Link Address. |
| Codec (H.264 / H.265) | The method used to compress video. H.265 is more efficient but fewer browsers can play it. |
| Bandwidth (kbps) | Amount of data sent per second. Higher is sharper and uses more of the line. 1000 kbps = 1 Mbps. |
| Delay | Time from a change on the source screen until it appears on the viewer's screen. |
| KVM | Keyboard, Video, Mouse — operating a PC with keyboard and mouse while watching its screen. |
| External server | A server the encoder sends to once, which then hands the video out to many people over the internet. |
| Relay (receiver) | When the encoder side cannot be opened, the receiver opens a door on its side so the encoder can send the video there. |
| UPnP · Port forwarding | Router settings that let traffic from the internet reach a device inside. UPnP does it automatically. |
| DHCP | Getting a network address automatically from the router. |
| HDCP | Copy protection for HDMI content. Protected content cannot be sent. |
11. Contact
HanVision Co., Ltd. · support@hanvision.xyz